I forgot to mention these treats in my chocolate cake and buttercream post... My mom used to do these for us kids. Use your leftover frosting and spread it on graham crackers to make sandwiches! She used to keep them in the fridge, but I didn't.
Tip: I read that you can keep a frosted buttercream cake out for a few days and it'll be ok to eat. Something about there being enough fat in the frosting it won't spoil. I did so with the Dino cake, because it was so big, and it was fine.
enjoy,
Showing posts with label Children. Show all posts
Showing posts with label Children. Show all posts
Thursday, April 15, 2010
Buttercream Frosting Treats


Sunday, January 31, 2010
Sew Cute Valentines!

I saw a link to Zakka Life about some cute crafty valentines, and at the end she posted another style she made. I thought it was so cute I had to ask my 6 year old which ones she wanted to make. So I scratched my other crafty idea for valentines and made these instead! Everything came from the Dollar Tree store, they were out of heart shape doilies so I found rectangle doilies in their wedding decorations sections (much easier to sew a straight line, than a heart shape line anyways, haha).
We added some stickers to them and signed the backs with her name. Then I pinned a freezer baggie (more sturdier) over the front and sewed a straight stitch around the edge of the plain part of the doily. Leave one end open so you can fill with your treats and then sew it up. Trim the excess baggy off around your stitch and there ya go! I guess they'll have to rip open the baggy to get the candy out. =)

I made these way ahead of time, so just don't plan to make them the night before. It took me probably 2 hours, and be sure to practice sewing on a spare doilie because at first I wanted to use a cute zig zag stitch, but it ate my doilie up! So I recommend a straight stitch.
click to check it out closer:

♥


I am participating in Made By You Mondays, Valentine SYS Party and Making The World Cuter with my Valentines!


♥
enjoy,
♥
enjoy,
Sunday, October 18, 2009
Spooky Shrunken Apple Heads

I found a great foodie craft you can help your kiddos with! They'll enjoy watching them change over the days! I placed ours on tree twigs, in a large vase with flat river rocks, dried craft moss and tree leaves.
 |
| From Mommy I'm Hungry |

Shrunken Apple Heads
as seen here
supplies and ingredients:
apples*
lemon juice
salt
paring knife
vegetable peeler*
rice grains
whole cloves
sticks
rocks
moss
vase
You can use any variety of apple. I like to use a variety because they all dry differently so you'll get some different results. Granny Smith's are probably my favorite though.
Fill a large mixing bowl with cold water and give it a couple douses of lemon juice and a spoonful of salt. Use a vegetable peeler to peel your apples. Get as much from around the stem as you can, or leave some to make a little hat.
As each apple gets peeled, plop it in the lemon juice/water/salt bowl. When you're ready to carve, use a small paring knife to cut into your apple. The vegetable peeler end works great for eye holes. Using tweezers, stick grains of rice in their mouth, or cloves for the eyeballs. Remember that the apple is going to wither and shrink, so you want to exaggerate features. You also don't need to get too detailed. General shapes are great and details get totally lost anyway.
*You can also sit them in a warm oven (170') for an hour or so a day, to help the drying process faster so they won't mold (near the end, one of mine started to). This took 1-2 weeks.
So get started now to enjoy yours for Halloween!

 |
| From Mommy I'm Hungry |
Have fun,
Sunday, August 30, 2009
A Rainbow Birthday Cake
 |
| From Mommy I'm Hungry |
click photos for full view
Earlier this month we celebrated a Birthday in our family. Brooke from Conversations With A Cupcake blogged about her colorful fruity cake, and I knew I had to make one for my little girl who's now 6! How fun is this cake?
This was a HUGE hit! She didn't know about it being rainbow until I cut into it! I shared a preview of this on Facebook, and everyone loved it. It was the tallest cake I have ever made! So tall I had to remove shelves in my fridge! Even though the layers aren't a full layer size, the cake still equals out to being 4 regular layers tall, each cut in half, get it?
Each layer has it's own wonderful fruity flavor! *I used a 16 oz bag of frozen berry medley which had the berries I needed.
I used a double batch of frosting, and it wasn't enough. As you can see it's pretty much plain, I didn't have enough for piping and such. So make a triple batch if you want to decorate all out.
*Here's a cake support tip: stick a cake dowel rod in the middle of the whole cake to keep it in place!
(I just noticed, you can see how tall it is, sitting next to a gallon of milk in the fridge!)
 |
| From Mommy I'm Hungry |
Double batch of boxed white cake mix -2 boxes (or homemade batches if you prefer minus the egg, water, oil below)
6 eggs
1 c. water
2/3 c. vegetable oil
Zest of 1 orange + 2 T. juice
Zest of 1 lemon + 2 T. juice
Zest of 1 lime + 2 T. juice
1/2 c. fresh or frozen raspberries, mashed
1/2 c. fresh or frozen blueberries, mashed
1/2 c. fresh or frozen blackberries, mashed
Wilton's gel icing colors in red, orange, yellow, green, blue and purple
6 bowls
6 disposable round 8" foil cake pans (square pans would be fun too, check the $1 store!)
Make the batter for the cake as directed using the eggs, water and oil. Scoop 1 Cup of cake batter in each of the 6 bowls.
In the first bowl, mix raspberries and 1/4 tsp. red coloring in the batter.
In the second bowl, mix orange zest and juice, and 1/2 tsp. orange coloring.
In the third bowl, mix lemon zest and juice and 1/4 tsp. yellow coloring.
In the fourth bowl, mix lime zest and juice and 1/4 tsp. green coloring.
In the fifth bowl, mix blueberries and 1/4 tsp. blue coloring.
In the sixth bowl, mix blackberries and 1/4 tsp. purple coloring.
Prepare six 8 inch cake pans by greasing and flouring each generously. Using a spatula, spoon and spread each color of batter into its own cake pan. Bake in an oven, preheated to 350 degrees for 17-20 minutes, or until tops spring back when touched lightly. Allow to cool completely. Frost.
Cream Cheese Icing (For this cake, I doubled it -to the right)
1/2 c. butter (softened) -1C.
8 oz. pkg cream cheese (softened) -16 oz.
4 c. (1 lb) confectioner's sugar -8 C. (2 lb)
1 tsp Vanilla or lemon extract
Cream butter and cream cheese until smooth. Add sugar and extract. Beat on high speed until smooth, light and fluffy. Frost cake.
 |
| From Mommy I'm Hungry |
I am sharing a piece with Tina @
enjoy,
Saturday, February 7, 2009
Rolled Banana Snacks

Here's another simple snack idea since my other one went over well.
Spread a banana with peanut butter, slice into bite size pieces, roll in rice krispie cereal (cocoa krispies would be great too!)

enjoy,

Friday, February 6, 2009
Peanut Butter Banana Snack

A simple idea really. Great for a snack.
Graham crackers
creamy peanut butter
sliced banana
Spread your graham crackers with peanut butter and add sliced bananas.

enjoy,

enjoy,
Saturday, October 25, 2008
Cake Walk Goodies

see more of these at my Flickr
I volunteered to donate some homemade baked goods for my little one's Halloween Festivities at school, for the cake walk game. I wonder if any of the 6 winners that chose mine, will visit my Blog (ok, so I snuck in a website URL card, heehee). Here is what I baked up:

Green and orange vanilla cupcakes from Joy of baking:
Vanilla Cupcakes:
1/2 cup (113 grams) unsalted butter, room temperature
2/3 cup (130 grams) granulated white sugar
3 large eggs
1 teaspoon pure vanilla extract
1 1/2 cups (210 grams) all purpose flour
1 1/2 teaspoons baking powder
1/4 teaspoon salt
1/4 cup (60 ml) milk
-food coloring
Preheat oven to 350 degrees F (177 degrees C) and butter or line 12 muffin cups with paper liners.
Cream the butter and sugar until light and fluffy. Add the eggs, one at a time, beating well after each addition. Beat in the vanilla extract.
In a separate bowl whisk together the flour, baking powder, and salt.
With the mixer on low speed, alternately add the flour mixture and milk, in three additions, beginning and ending with the flour, stir in food coloring. Scrape down the sides of the bowl.
Evenly fill the muffin cups with the batter and bake for about 18-20 minutes or until nicely browned and a toothpick inserted into a cupcake comes out clean. Remove from oven and place on a wire rack to cool. Once the cupcakes have completely cooled, frost with icing. If you want flat topped cupcakes then slice off the dome of each cupcake, with a sharp knife, before frosting.
Orange and green cream cheese frosting from Art of Dessert:
Frosting:
8 oz. bar cream cheese, cold
1/2 cup butter , softened to room temperature
1 tsp vanilla extract
3 1/2 cups powdered sugar, measure then sift
-food coloring
Beat the cream cheese and butter till blended.Mix in vanilla extract. Slowly add the powdered sugar, a cup at a time.Once all the powdered sugar is added, increase to a higher speed to whip up the frosting till light and fluffy. Stir in food coloring. Frost cupcakes.
(I recommend serving these within a couple of hours and storing these in the fridge so the frosting doesn't break down or melt)


Sugar cookies with sprinkles from Betty Crocker.
3 cups powdered sugar
2 cups butter or margarine, softened
2 teaspoons vanilla
1 teaspoon almond extract
2 eggs
5 cups all-purpose flour
2 teaspoons baking soda
2 teaspoons cream of tartar
In large bowl, beat 3 cups powdered sugar, the butter, vanilla, 1 teaspoon almond extract and eggs with electric mixer on medium speed, or mix with spoon. Stir in flour, baking soda and cream of tartar. Cover and refrigerate at least 2 hours.
Heat oven to 375°F. Lightly grease cookie sheet. Divide dough in half. On lightly floured surface, roll each half 1/8 inch thick. Cut into desired shapes with 3-inch cookie cutters. Place about 2 inches apart on cookie sheet. (I use use larger cookie cutters, and sprinkle with colored sugars/sprinkles before baking)
Bake 5 to 7 minutes or until edges are light brown. Remove from cookie sheet to wire rack. Cool completely, about 30 minutes.
if only they stayed looking like this

Ok, so these didn't make it to the Halloween Festival. For some strange reason, these buggers spread out and lost their cookie cutter shape and became too big for the containers. They looked like blobs of sprinkled sugar cookies. I tried freezing the cutouts for a bit then baked right away, that helped some but I still wasn't impressed with their shapes, but they tasted great. Anyways, these are a favorite, that make it to my Holiday cookie trays every year.
Thursday, October 16, 2008
3rd Annual World Day of Bread '08:Cheesy Mustard Pretzels
Be sure to check out breads from all around the World!

For the World Bread basket, I bring to you pretzels, Cheesy Mustard Pretzels!
Something I knew the kids would enjoy. If you're like me, you've collected those recipe magazines from the checkout counters. That's where part of this recipe comes from, the technique comes from another source. See, I thought these would be better as pretzels than a loaf of bread baked in my bread machine. Having never made pretzels before, I found this pretty easy. Make a dough, cut it, twist it then bake. Easy. They came out soft and chewy.
Cheesy Mustard Pretzels 2-Pound Recipe for a Bread Machine
1 cup plus 2 tablespoons water
1 1/2 tablespoons vegetable oil
3 tablespoons mustard
4 cups bread flour
2 tablespoons sugar
1 teaspoon salt
2 teaspoons bread machine or quick active dry yeast
2/3 cup shredded, sharp cheddar cheese (we think it could use more, maybe 1/2 C)
Coarse Salt, if desired
Beaten egg with 1TBL water, whisked
Measure carefully, placing all ingredients except cheese and coarse salt in bread machine pan in the order recommended by the manufacturer. Select Dough/manual cycle. Add the cheese 5 to 10 minutes before the last kneading cycle ends.
Once the cycle is complete, place dough on a lightly floured surface. Roll into a 14x6-inch rectangle. Cut into 12 strips 14x1/2-inch long. Gently pull each strip into a 16" rope. To shape pretzels, make a strip into a circle; cross ends at top. Twist ends and lay over bottom of circle. Place on greased cookie sheets. Do not let rise! Brush tops with egg wash, sprinkle with coarse salt. Bake 350' for 8-20 minutes. Makes 12 pretzels.
-Dough recipe can also be found in the Betty Crocker's Best Bread Machine Cookbook. Pretzel technique comes from Fleischmann's Yeast Bread Machine Favorites.

cutting them into strips -yes on my stove top, it works great!
ready to shape
doing the twist

chewy outside, soft inside

Wednesday, August 13, 2008
Pigs In A Blanket

I was getting bored with the kid's lunches at home, and then these came to mind! Very very easy to make. I didn't cut my triangles, just wrapped and baked. I also used some garlic herb seasoning, parsley and parmesan to flavor them. The second time I made them, I sprinkled some cheese in with the little smokies. My kids ate some, because they just aren't hot dog eaters. These would be great for a party though.


Wednesday, June 25, 2008
Homemade Oreos
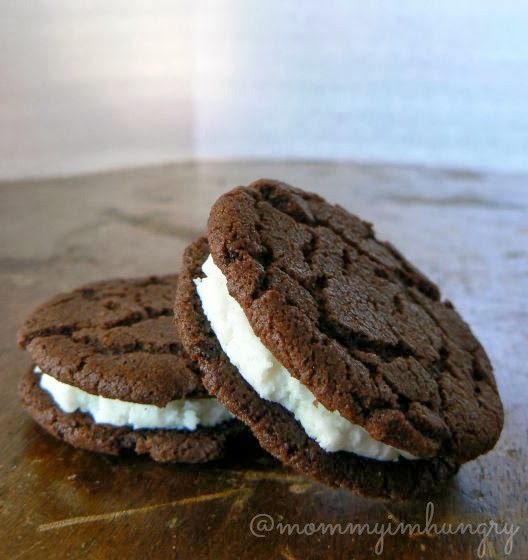
Yes, homemade! How fun are these? My oldest daughter's class was having an end of the year school party and she wanted me to make something for her to bring. Having seen these cookies around the food blogosphere, I said I'd make some Oreos! I pulled up some sites of everyone else making them to show her and used the recipe from Nosheteria. These are really easy and fun to make. I had to make a double batch because of her class size plus a few extras, and well because we wanted a few for home too. The ones for her class I placed colorful M&Ms on top before baking. They were a hit with the kids, her teacher even took 2! I do recommend eating these within a day or two, or they just aren't as fresh.


Subscribe to:
Posts (Atom)